- Simply installing WAMP On Windows
- Apache
- What is a Web Server?
- Why Apache?
- All-in-one Packages
- The Apache Installation Wizard
- Manual Installation
- PHP
- Why PHP?
- Why Install PHP Locally?
- All-in-One packages
- The PHP Installer
- Manual Installation
- MySQL
- Why MySQL?
- Why Install MySQL Locally?
- All-in-One packages
- The MySQL Installation Wizard
- Manual Installation
- Step 1: Download the files
- Step 2: Extract the files
- Step 3: move the data folder
- Step 3: Create an option file
- Step 4: Initialize the data directory
- Step 5: Add the MySQL base and data directories to your PATH statement.
- Step 6: Start the server for the first time
- Step 7: Secure your MySQL instance
- Step 8: Login to your server
- Simply installing LAMP On Ubuntu
- Thats All Folks!
Simply installing WAMP On Windows
Apache
What is a Web Server?
A web server is software that listens for requests and returns data (usually a file). When you type www.mysite.com, the request is forwarded to a machine running web server software which returns a file back to your browser — such as the contents of index.html. The browser might then make further requests based on the HTML content — like CSS, JavaScript, and graphic files.
Since the web server sits between your browser and the requested file, it can perform processing that’s not possible by opening an HTML file directly. For example, it can parse PHP code which connects to a database and returns data.
You can use your host’s web server for testing, but uploading will become tiresome and changes could go live before they’ve been fully tested. What you need is a local web server installation.
Why Apache?
In general, it’s good to use the web server software that your web host uses. Unless you’re creating ASP.NET applications on Microsoft IIS, your host is likely to use Apache — the most widespread and fully-featured web server available. It’s an open-source project, so it doesn’t cost anything to download or install.
The following instructions describe how to install Apache on Windows. macOS comes with Apache and PHP. Most Linux users will have Apache pre-installed or available in the base repositories.
All-in-one Packages
There are some excellent all-in-one Windows distributions that contain Apache, PHP, MySQL and other applications in a single installation file — such as XAMPP (for Windows, Linux and macOS), WampServer and WampDeveloper Pro. There’s nothing wrong with using these packages, although manually installing Apache will help you learn more about the system and its configuration options.
The Apache Installation Wizard
An excellent official .msi installation wizard is available from the Apache download page. This option is certainly recommended for novice users or perhaps those installing Apache for the first time.
Manual Installation
Manual installation offers several benefits:
- Backing up, reinstalling, or moving the web server can be achieved in seconds.
- You have more control over how and when Apache starts.
- You can install Apache anywhere, such as a portable USB drive (useful for client demonstrations).
Step 1: Configure IIS
Apache listens for requests on TCP/IP port 80. You need to uninstall or disable any program that uses that port. If you have a Professional or Server version of Windows, you may already have IIS installed. If you would prefer Apache, either remove IIS as a Windows component or disable its services.
Step 2: Download the files
We’re going to use the unofficial Windows binary from Apache Lounge. This version has performance and stability improvements over the official Apache distribution, although I’m yet to notice a significant difference. However, it’s provided as a manually installable ZIP file from www.apachelounge.com/download/.
You should also download and install the Windows C++ runtime from Microsoft.com. You may have this installed already, but there is no harm installing it again.
As always, remember to virus scan all downloads.
Step 3: Extract the Files
We’ll install Apache in C:/Apache24, so extract the ZIP file to the root of the C:/ drive. Apache can be installed anywhere on your system, but you’ll need to change SVROOT configuration to point to your unzipped location — such as E:/Apache24.
Step 4: Configure Apache
Apache is configured with the text file conf/httpd.conf contained in the Apache folder. Open it with your favorite text editor.
Note that all file path settings use a forward slash (/) rather than the Windows backslash. If you installed Apache anywhere other than C:/Apache24, now is a good time to search and replace all references to C:/Apache24.
There are several lines you should change for your production environment:
- Line 60, listen to all requests on port 80:
Listen *:80
- Line 162, enable mod-rewrite by removing the # (optional, but useful):
LoadModule rewrite_module modules/mod_rewrite.so
- Line 227, specify the server domain name:
ServerName localhost:80
- Line 235, allow
.htaccessoverrides:
AllowOverride All
Step 4: Change the Web Page Root (optional)
By default, Apache returns files found in its C:/Apache24/htdocs folder. It’s good to use a folder on an another drive or partition to make backups and re-installation easier. For the purposes of this example, we’ll create a folder called D:\WebPages and change httpd.conf accordingly:
- Line 251, set the root:
DocumentRoot "D:/WebPages"
- Line 252:
<Directory "D:/WebPages">
Step 5: Test your Installation
Your Apache configuration can now be tested. Open a command box (Start > Run > cmd) and enter:
# navigate to Apache bin directory
cd /Apache24/bin
# Test httpd.conf validity
httpd -t
It should say Syntax OK. If not, correct any httpd.conf configuration errors and retest until none appear.
Step 6: install Apache as a Windows service
The easiest way to start Apache is to add it as a Windows service. Open a new command prompt as administrator, and enter the following:
cd /Apache24/bin
httpd -k install
Open the Control Panel, Administrative Tools, then Services and double-click Apache2.4. Set the Startup type to Automatic to ensure Apache starts every time you boot your PC.
Alternatively, set the Startup type to Manual and launch Apache whenever you choose using the command net start Apache2.4.
Step 7: Test the Web server
Create a file named index.html in Apache’s web page root (either htdocs or D:\WebPages) and add a little HTML code:
<html>
    <head>
        <title>Testing Apache</title>
    </head>
    <body>
        <p>Apache is working!</p>
    </body>
</html>
Ensure Apache has started successfully, open a web browser and enter the address http://localhost/. If all goes well, your test page should appear.
In general, most problems will be caused by an incorrect setting in the httpd.conf configuration file. Refer to the Apache documentation if you require further information.
PHP
Why PHP?
PHP remains the most widespread and popular server-side programming language on the web. It is installed by most web hosts, has a simple learning curve, close ties with the MySQL database, and an excellent collection of libraries to cut your development time. PHP may not be perfect, but it should certainly be considered for your next web application. Both Yahoo and Facebook use it with great success.
Why Install PHP Locally?
Installing PHP on your development PC allows you to safely create and test a web application without affecting the data or systems on your live website. This lesson describes PHP installation as a module within the Windows version of Apache 2.2. Mac and Linux users will probably have it installed already.
All-in-One packages
There are some excellent all-in-one Windows distributions that contain Apache, PHP, MySQL and other applications in a single installation file, e.g. XAMPP (including a Mac version), WampServer and Web.Developer. There is nothing wrong with using these packages, although manually installing Apache and PHP will help you learn more about the system and its configuration options.
The PHP Installer
Although an installer is available from php.net, I would recommend the manual installation if you already have a web server configured and running.
Manual Installation
Manual installation offers several benefits:
- backing up, reinstalling, or moving the web server can be achieved in seconds (see 8 Tips for Surviving PC Failure) and
- you have more control over PHP and Apache configuration.
Step 1: Download the files
Download the latest PHP 5 ZIP package from www.php.net/downloads.php
As always, virus scan the file and check its MD5 checksum using a tool such as fsum.
Step 2: Extract the files
We will install the PHP files to C:\php, so create that folder and extract the contents of the ZIP file into it.
PHP can be installed anywhere on your system, but you will need to change the paths referenced in the following steps.
Step 3: Configure php.ini
Copy C:\php\php.ini-development to C:\php\php.ini. There are several lines you will need to change in a text editor (use search to find the current setting). Where applicable, you will need to remove the leading semicolon to uncomment these setting.
Define the extension directory:
extension_dir = "C:/php/ext"
Enable extensions. This will depend on the libraries you want to use, but the following extensions should be suitable for the majority of applications:
extension=curl
extension=gd2
extension=mbstring
extension=mysql
extension=pdo_mysql
extension=xmlrpc
If you want to send emails using the PHP mail() function, enter the details of an SMTP server (your ISP’s server should be suitable):
[mail function]
; For Win32 only.
SMTP = mail.myisp.com
smtp_port = 25

; For Win32 only.
sendmail_from = my@emailaddress.com
Step 4: Add C:\php to the path environment variable
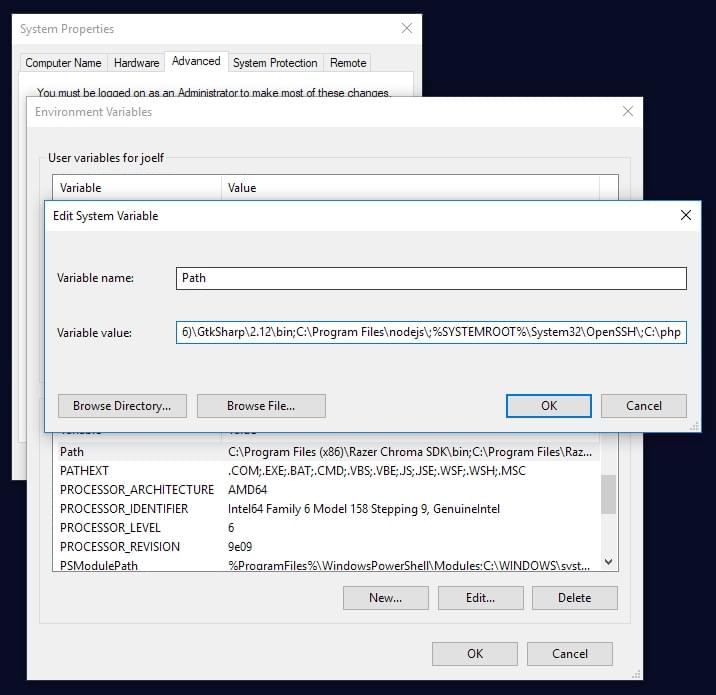
To ensure Windows can find PHP, you need to change the path environment variable. Open Settings, type ‘environment variables’ into the search field and open the result. Select the Advanced tab, and click the Environment Variables button.
Scroll down the System variables list and click on Path followed by the Edit button. Click Edit text and add ;C:\php to the end of the Variable value line (remember the semicolon).

Now click OK until you’re out. You might need to reboot at this stage.
Step 5: Configure PHP as an Apache module
Ensure Apache is not running (use net stop Apache2.2 from the command line) and open its conf\httpd.conf configuration file in an editor. The following lines should be changed:
On line 239, add index.php as a default file name:
DirectoryIndex index.php index.html
At the bottom of the file, add the following lines (change the PHP file locations if necessary):
# PHP5 module
LoadModule php_module "c:/php/php8apache2_4.dll"
#LoadModule php5_module "c:/php/php5apache2_2.dll"
# LoadModule php7_module "c:/php/php7apache2_4.dll"
AddType application/x-httpd-php .php
PHPIniDir "C:/php"
Save the configuration file and test it from the command line (Start > Run > cmd):
cd /Apache24/bin
httpd -t
Step 6: Test a PHP file
Create a file named index.php in Apache’s web page root (either htdocs or D:\WebPages) and add this code:
<?php phpinfo(); ?>
Ensure Apache has started successfully, open a web browser and enter the address http://localhost/. If all goes well, the “PHP version” info page should appear showing all the configuration settings.
MySQL
Why MySQL?
MySQL is undoubtedly the most popular and widely-used open source database:
- it is simple to set up and use
- it is recognised as one of the fastest database engines
- most Linux (and many Windows-based) web hosts offer MySQL
- MySQL is closely integrated with PHP, which makes it an ideal candidate for many web applications.
Why Install MySQL Locally?
Installing MySQL on your development PC allows you to safely create and test a web application without affecting the data or systems on your live website.
This lesson describes how to install MySQL on Windows, but versions are available for Mac, Linux, and several other operating systems.
All-in-One packages
There are some excellent all-in-one Windows distributions that contain Apache, PHP, MySQL and other applications in a single installation file, e.g. XAMPP, WampServer and Web.Developer. There is nothing wrong with using these packages, but manually installing MySQL will help you learn more about the system and give you more control.
The MySQL Installation Wizard
An excellent .msi installation wizard is available for MySQL. The wizard creates the my.ini configuration file and installs MySQL as a service. This option is certainly recommended for novice users or perhaps those installing MySQL for the first time.
Manual Installation
Manual installation offers several benefits:
- backing up, reinstalling, or moving databases can be achieved in seconds (see 8 Tips for Surviving PC Failure)
- you have more control over how and when MySQL starts
- you can install MySQL anywhere, such as a portable USB drive (useful for client demonstrations).
One of the nice features of MySQL as a database software is its noinstall option in which you download the files themselves and perform a manual installation that takes just under a gigabyte of space on your drive. If you’re a developer or a student, this means you can quickly create a new self-contained instance wherever you need it and then blow it away if you need to without cluttering up your registry.
This does mean working on the command line so you’ll want to have a certain comfort level with that. You will also need to be working with Administrative privileges.
Step 1: Download the files
From https://dev.mysql.com/downloads/mysql/ , you’ll need the Windows (x86, 64-bit), ZIP Archive download, assuming your machine is 64-bit. As of this writing, the current version is 8.0.14. Just download this to a convenient location on your computer.
Step 2: Extract the files
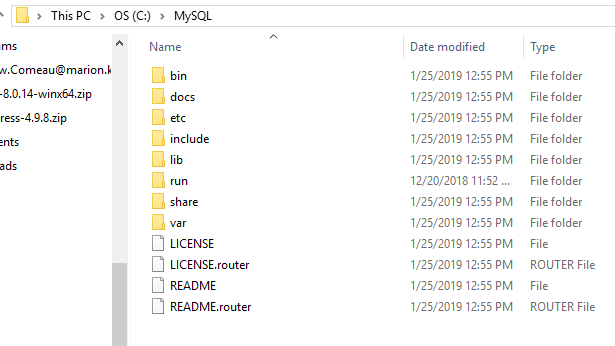
It’s best to choose a simple location for the MySQL files; C:\MySQL is common. Once you’ve extracted the ZIP archive and placed them, your working folder should look like this:
MySQL installation folder
Step 3: move the data folder
I recommend placing the data folder on another drive or partition to make backups and re-installation easier. For the purposes of this example, we will create a folder called D:\MySQL\data and move the contents of C:\mysql\data into it.
You should now have two folders, D:\MySQL\data\mysql and D:\MySQL\data\test. The original C:\mysql\data folder can be removed.
Step 3: Create an option file
MySQL needs a my.ini settings file to tell it about key settings and directory. This text file can contain a lot of settings but to start out, you just need to tell the initialization program where the files are located. MySQL will look for this file in different places but to keep it simple, just create it at C:\MySQL\my.ini, paste the following text into it using your favorite text editor and save it. Be sure to change the directories shown here to match your actual installation.
[mysqld]
# basedir = the installation path
basedir=C:/mysql
# datadir = the location of the data directory
datadir=D:/mysql/data
The second directory shown is the directory in which MySQL will store your database files. It does not need to be in the same directory as the rest of the files but it’s good to keep things contained.
If you’re running more than one instance of MySQL or another database server, you might need to change the port that MySQL communicates on. By default, it’s 3306 but you can change it to any other port that’s not currently being used such as 3360. To do this, add a single line to your option file at the end of the [mysqld] section shown above.
port=3360
This line will actually need to be put in twice so that you can login via the command line. A separate section, [client], specifies settings for the command line client program.
[client]
port=3360
Step 4: Initialize the data directory
MySQL needs to create a data directory and create all the necessary files to maintain your databases there so the next step is to run the initialization program that will carry this out. From the Windows command line, run either of the following commands:
mysqld --initialize --console
mysqld --initialize-insecure --console
The –initialize option on its own will create the data directory and assign a random password for the root user on this instance of MySQL. The console output during the initialization will include the password so you’ll need to be paying attention during the process. If you would prefer to create your own password later (as I usually do), just use the –initialize-insecure option.
The output should look something like this.
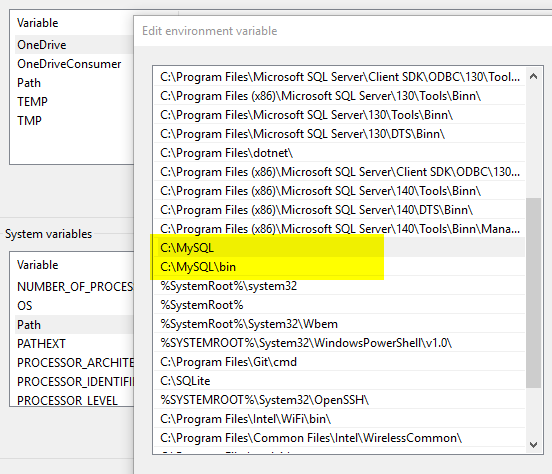
Step 5: Add the MySQL base and data directories to your PATH statement.
If you’re going to be working from the command line, it’s easier if you don’t have to specify the installation directory every time you want to work with MySQL. To be safe, add the MySQL and MySQL\bin directories to your system path.
Step 6: Start the server for the first time
With a minimal installation that’s run from the command line, you will need to start the server each time you want to use it. You can do this with the mysqld program in the bin directory.
mysqld --console
This command will start the MySQL server but the window will not return you to the command prompt until you shut down the server. To login to the server and work with databases, you will need to minimize the command window you used to start the server and open a new one.
When you want to shut down the server, you can either use the CTRL-C shortcut in the window that’s running the server or open another command window and enter the following command.
mysqladmin -u root shutdown
When you run this command, the original window will display the shutdown routine.
You can also install MySQL as a service that will start when Windows starts up by using the same command with a different switch.
mysqld --install
The –remove switch will remove the service from Windows.
Step 7: Secure your MySQL instance
As mentioned earlier, you can choose to leave the root password blank during installation and set it later. Your root user, which has full rights to everything, should definitely have a strong password even on a local installation. There are also a few other steps that you can take such as removing the test database that’s open to everyone.
Once you’ve started your server, you can run though the list of steps for securing your installation with one command
mysql_secure_installation
This program automates the process of securing the instance as shown below.
Step 8: Login to your server
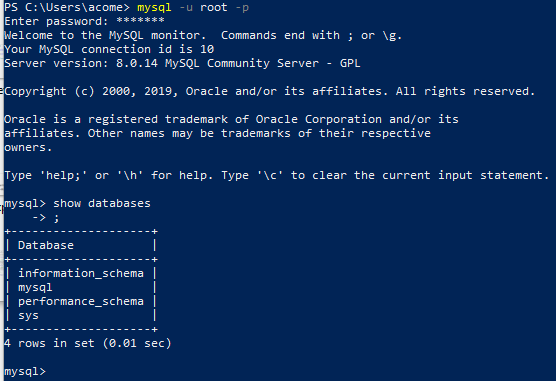
Once everything is setup, you just need to login using the regular mysql program command.
mysql -u root -p
The -u switch specifies the user and the -p is used on its own so that MySQL will prompt you for the password and hide the characters while you type.
Don’t forget, as I did in the above screenshot, that once you’re working in MySQL, most commands are terminated with a semi-colon.
To log out, simply type exit at the mysql> prompt.
Simply installing LAMP On Ubuntu
In this lesson, I will show you how to install a LAMP system. LAMP stands for Linux, Apache, MySQL, PHP. The lesson is intended to help those who have some knowledge of using Linux.
Apache
Step 1: Install Apache
To start off we will install Apache.
1. Open up the Terminal (Applications > Accessories > Terminal).
2. Copy/Paste the following line of code into Terminal and then press enter:
sudo apt-get install apache2
3. The Terminal will then ask you for you’re password, type it and then press enter.
Step 2: Testing Apache
To make sure everything installed correctly we will now test Apache to ensure it is working properly.
1. Open up any web browser and then enter the following into the web address:
http://localhost/
You should see a folder entitled apache2-default/. Open it and you will see a message saying “It works!”.
PHP
Step 1: Install PHP
In this part we will install PHP 5.
1. Again open up the Terminal (Applications > Accessories > Terminal).
2. Copy/Paste the following line into Terminal and press enter:
sudo apt-get install php5 libapache2-mod-php5
3. In order for PHP to work and be compatible with Apache we must restart it. Type the following code in Terminal to do this:
sudo /etc/init.d/apache2 restart
Step 2: Test PHP
To ensure there are no issues with PHP let’s give it a quick test run.
1. In the terminal copy/paste the following line:
sudo gedit /var/www/testphp.php
This will open up a file called phptest.php.
2. Copy/Paste this line into the phptest file:
<?php phpinfo(); ?>
3. Save and close the file.
4. Now open you’re web browser and type the following into the web address:
http://localhost/testphp.php
You should have succesfully installed both Apache and PHP!
MySQL
Step 1: Install MySQL
To finish this lesson up we will install MySQL. (Note – Out of Apache and PHP, MySQL is the most difficult to set up. I will provide some great resources for anyone having trouble at the end of this lesson.)
1. Once again open up the amazing Terminal and then copy/paste this line:
sudo apt-get install mysql-server
2. (optional). In order for other computers on your network to view the server you have created, you must first edit the “Bind Address”. Begin by opening up Terminal to edit the my.cnf file.
gksudo gedit /etc/mysql/my.cnf
Change the line
bind-address = 127.0.0.1
And change the 127.0.0.1 to your IP address.
3. This is where things may start to get tricky. Begin by typing the following into Terminal:
mysql -u root
Following that copy/paste this line:
mysql> SET PASSWORD FOR 'root'@'localhost' = PASSWORD('yourpassword');
(Make sure to change yourpassword to a password of your choice.)
4. We are now going to install a program called phpMyAdmin which is an easy tool to edit your databases. Copy/paste the following line into Terminal:
sudo apt-get install libapache2-mod-auth-mysql php5-mysql phpmyadmin
After that is installed our next task is to get PHP to work with MySQL. To do this we will need to open a file entitled php.ini. To open it type the following:
gksudo gedit /etc/php5/apache2/php.ini
Now we are going to have to uncomment the following line by taking out the semicolon (😉.
Change this line:
;extension=mysql.so
To look like this:
extension=mysql.so
Now just restart Apache and you are all set!
sudo /etc/init.d/apache2 restart
Quick note to anyone who encountered problems with setting up the MySQL password, please refer to this page: MysqlPasswordReset


